Process
Seven steps. No shortcuts. Built to outlast the building.
Every Antonio Terrazzo install follows the same documented sequence — from preconstruction gates through the final polish and maintenance handoff. Here's what happens on your floor, in order, with the durations you can plug into your CPM schedule.
- Step 01
Preconstruction
Weeks −6 to −2 before pour
Spec review, divider-strip layout against the architectural plan, sample sign-off, schedule alignment with the GC, and gate review for slab readiness (age, MVER target, building dried-in, HVAC operational). We don't mobilize until each gate is verifiably green.
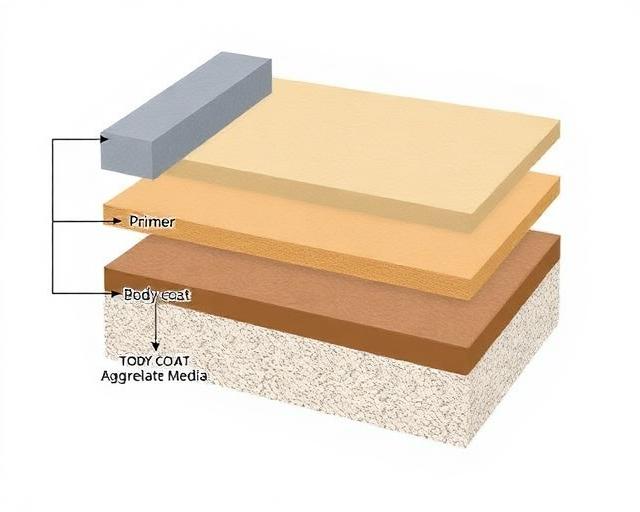
- Step 02
Substrate prep
Days 1–2
Mechanical shot-blasting or diamond grinding to ICRI CSP-3 to CSP-4 profile, crack chase and fill with rigid epoxy, and removal of any bond-breakers (sealers, curing compounds, paint). We test the prepped slab with a tape-pull before priming.
- Step 03
Moisture mitigation
Day 2 (if required)
ASTM F2170 in-situ RH probes at three locations per 1,000 sq ft. If readings exceed 75% RH, we apply a 100%-solids epoxy MVB rated to 100% RH before priming. We document every probe reading in the closeout package.
- Step 04
Divider strip layout
Days 3–4
Snap layout to the approved divider drawing, set zinc, brass, or aluminum L-angle strips in epoxy adhesive at every control joint and design line, and verify alignment with the architect's reflected ceiling plan if specified.
- Step 05
Matrix pour
Days 5–7
Pre-batched pigmented epoxy matrix is hand-blended with the specified aggregate package, trowel-applied between dividers to 3/8" nominal thickness, and consolidated. Pour proceeds in panels sized to the project's thermal-movement plan.
- Step 06
Grind, grout & re-grind
Days 8–11 (24-hour cure between passes)
Coarse-grit rough grind exposes aggregate. We grout-coat pinholes with matching matrix, cure 24 hours, then re-grind through progressively finer diamond grits (typically 50 → 100 → 200) until the surface is uniform.
- Step 07
Polish & seal
Days 12–13
Final polish to the specified gloss (typically 400–800 grit), penetrating sealer, and a sacrificial finish coat if requested. Floor protection goes down before we demobilize, and the owner gets a printed maintenance guide.
Process variations by system
The sequence shifts when the system shifts.
The seven steps above describe a poured-in-place epoxy terrazzo install. Our other systems share the discipline — preconstruction gates, moisture testing, mockups, and documented closeout — but the field sequence and durations differ. Quick orientation:
Longer schedule
Cementitious Terrazzo
Add 14–21 days for matrix cure before grinding. Substrate prep includes wire-lath or sand-cushion underbed depending on variant. No moisture-mitigation step (cement matrix is moisture-tolerant).
System detailsShop-built, site-set
Precast Terrazzo
Treads, bases, and panels are cast and ground in our shop. Site work compresses to layout, setting bed, mechanical anchoring, and joint grouting — often a 2–3 day field window per area.
System detailsNo pour, all grind
Polished Concrete
Skip steps 4 and 5. Sequence is: profile, densify, grind through diamond grits to the specified CPAA class and gloss, then stain-guard. Typical 4–6 days per 10,000 sq ft.
System detailsThin film, fast turnaround
Industrial Coatings
Shot-blast to CSP-3, prime, broadcast or trowel-apply the resin system to spec thickness, topcoat. Most projects complete in 2–4 days per area; polyaspartic can return to service in 24 hours.
System detailsDiagnose, then grind
Restoration
Walk-through and core sample first to confirm matrix and aggregate. Crack chase, divider replacement where needed, then re-grind through the same diamond grit progression as new work.
System detailsPair with the specifications
Every step ties to a line in the spec.
The process above is what we do in the field. The specifications page is what your design team writes to make sure we do it — CSI 09 66 23 section text, ASTM references, divider details, and the submittal log we deliver within 14 days of award.